29 min read · EN
Deployment & Maintenance
Learn to deploy static sites, configure custom domains, and maintain shipped projects.
Ship it and keep it running — learn to deploy projects and what happens after launch.
This Page Covers
- Localhost vs production environments
- Hosting options and deploying static sites
- Custom domains and DNS configuration
- SEO fundamentals (meta tags, sitemaps, Core Web Vitals)
- Analytics and visitor tracking
- Forms without a backend
- CI/CD basics and maintenance reality
Localhost vs Production
Development Environment
When you run npm run dev and open localhost:3000 in your browser, you are working in a development environment. This is your private workspace where you build and test your project.
What makes localhost special:
-
It only exists on your computer. No one else can see it. If you share the URL
localhost:3000with a friend, they will see nothing (or their own localhost). -
Hot reload works. When you save a file, the page updates automatically. This makes development fast and interactive.
-
Errors are detailed. You see full stack traces and helpful debugging information because security is not a concern — it is just you.
-
Performance does not matter as much. Your code is not optimized for speed because you are not serving thousands of users.
Think of localhost like your workshop. It is messy, full of tools, and exactly how you need it for building things. But you would not invite customers there.
Production Environment
Production is your live website that real people visit. When someone types yourwebsite.com into their browser, they see your production environment.
What makes production different:
-
Anyone can access it. If you share your production URL, anyone with an internet connection can visit.
-
Errors are hidden. Visitors see friendly error pages, not code details. Exposing error details could reveal security vulnerabilities.
-
Performance matters. Your code is optimized, compressed, and cached so pages load quickly for users around the world.
-
Changes require deployment. You cannot just save a file and see changes. You need to build and deploy your updated code.
Production is like a polished storefront. It is clean, professional, and ready for customers. The workshop messiness is hidden.
Key Differences
| Aspect | Localhost (Development) | Production (Live) |
|---|---|---|
| URL | localhost:3000 |
yourdomain.com |
| Access | Only you | Everyone |
| Speed | Fast (local files) | Depends on hosting and user location |
| Errors | Detailed (for debugging) | Hidden (for security) |
| Updates | Instant (hot reload) | Requires deployment |
| Purpose | Building and testing | Serving real users |
Environment Variables
One important difference between development and production is how you handle environment variables — things like API keys, database connections, and other configuration values.
In development, you might have a file called .env.local with values like:
DATABASE_URL=my-local-database
API_KEY=test-key-12345
In production, these same variables exist, but with different values (your real database, your real API key). You configure these in your hosting platform, not in files.
Why this matters: Never put real production secrets in files that get uploaded to GitHub. Keep development values in local files (which should be in your .gitignore), and configure production values directly in your hosting platform.
Hosting Options
There are many places to host your website. Here are the most beginner-friendly options, all with generous free tiers.
Netlify
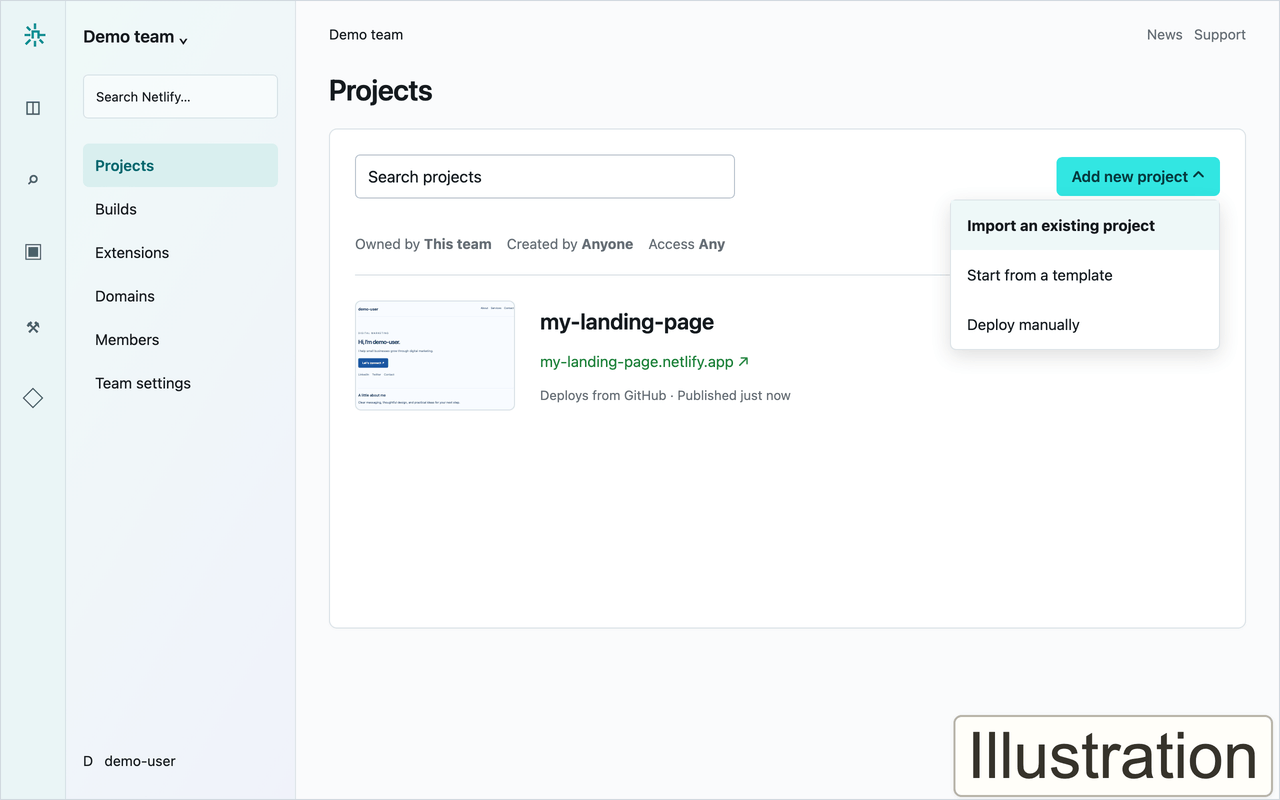
Illustration of the Netlify Projects dashboard.
The labelled illustrations in this lesson use neutral demo projects, not live accounts or deployments. Netlify now calls sites "projects"; use Add new project to import your repository. Layouts and labels may vary.
Netlify is one of the most popular choices for hosting static websites and modern web apps.
What it is good for:
- Static websites (HTML, CSS, JavaScript)
- React, Vue, Next.js, and other modern frameworks
- Automatic deployments when you push to GitHub
Free tier includes (credit-based):
- $0 forever
- 300 credits per month
- Unlimited static sites
- Automatic HTTPS (secure connection)
- Custom domain support
- Continuous deployment from Git
Current Netlify plans (as of now):
- Free: $0 forever, 300 credits/month
- Personal: $9/month, 1,000 credits/month
- Pro: $20 per member/month, 3,000 credits/month
- Enterprise: Custom pricing
Why developers love it: Netlify makes deployment incredibly simple. Connect your GitHub repository, and every time you push code, Netlify automatically builds and deploys your site. No server configuration needed.
Vercel
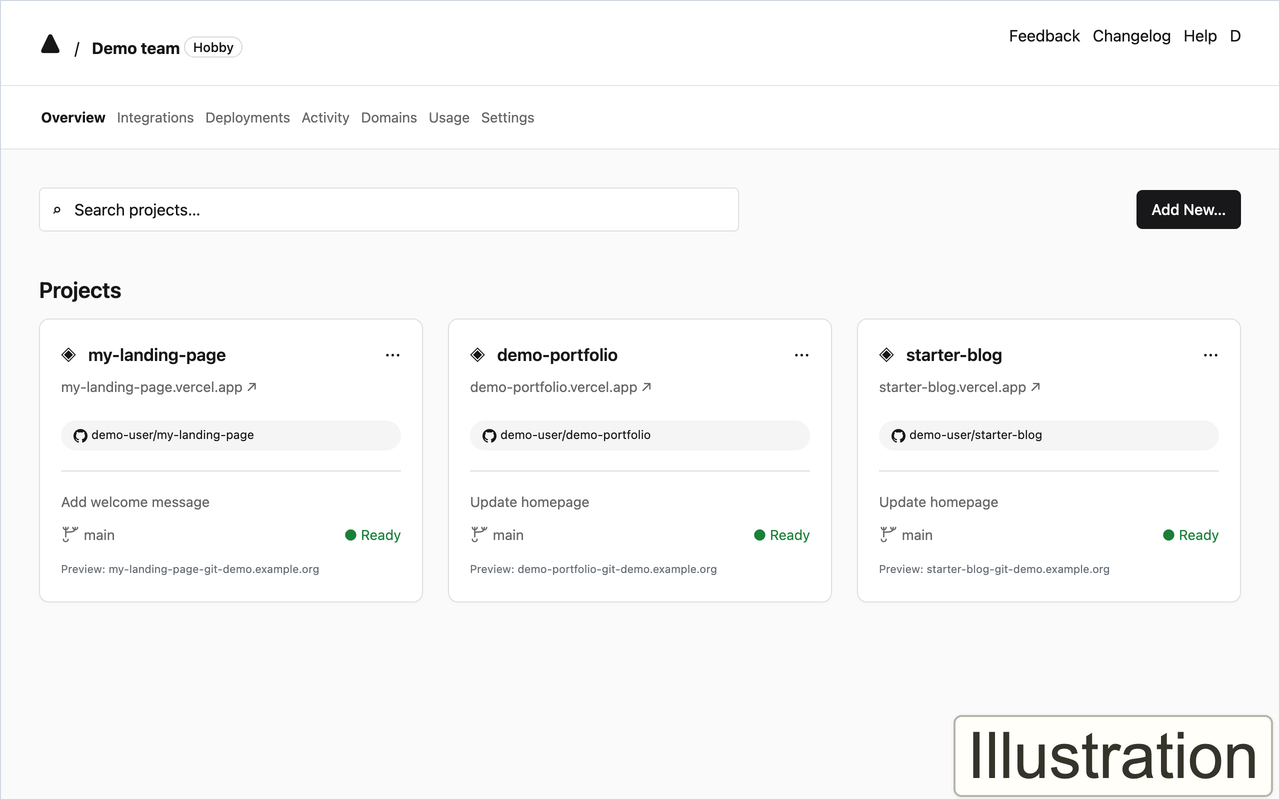
Illustration of the Vercel projects overview.
Simplified overview based on Vercel's public dashboard references. All addresses are illustrative.
Vercel is made by the same team that created Next.js, so it works especially well with that framework.
What it is good for:
- Next.js projects (optimal integration)
- React and other frontend frameworks
- Projects that need serverless functions
Free tier includes:
- Generous bandwidth on the free tier (check current limits)
- Unlimited deployments
- Automatic HTTPS
- Custom domain support
- Preview deployments for every branch
When to choose Vercel: If you are building with Next.js, Vercel is the natural choice. The integration is seamless and you get optimal performance without any configuration.
GitHub Pages
GitHub Pages is free hosting that comes built into GitHub.
What it is good for:
- Simple static websites
- Documentation sites
- Personal portfolio pages
- Project demo pages
Free tier includes:
- Hosting for one site per repository
- Custom domain support
- Automatic HTTPS
Limitations:
- Static files only (no server-side code)
- 1 GB storage limit per site
- Bandwidth limits apply
- No build process (unless you set up GitHub Actions)
When to choose GitHub Pages: For simple HTML/CSS/JavaScript sites that do not need a build process, GitHub Pages is the easiest option. It is already where your code lives.
Railway
Railway is different from the others — it can host backend services and databases, not just static files.
What it is good for:
- Full-stack applications
- APIs and backend services
- Databases (PostgreSQL, MySQL, MongoDB)
- Projects that need server-side code
Free tier includes:
- $5 of free usage per month
- Database hosting
- Environment variables
- Automatic deployments
When to choose Railway: If your project needs a real backend or database (not just a static frontend), Railway is a great starting point. It is more powerful than Netlify or Vercel for backend work, while still being beginner-friendly.
Comparison Table
| Platform | Best For | Free Tier | Databases | Ease of Use |
|---|---|---|---|---|
| Netlify | Static sites, JAMstack | Credit-based (Free plan) | No (via functions) | Very Easy |
| Vercel | Next.js, React apps | Generous free tier | Via integrations | Very Easy |
| GitHub Pages | Simple static sites | Free (static only) | No | Easiest |
| Railway | Full-stack, backends | ~$5/month credit | Yes | Easy |
My recommendation: Start with Netlify for your first deployments. It is beginner-friendly, has excellent documentation, and works with almost any project. Once you are comfortable, explore the others based on your specific needs.
Deploying to Netlify
Let us walk through deploying your first site to Netlify. This is the most common path for beginners.
Step 1: Push Your Code to GitHub
Before deploying, your code needs to be on GitHub. If you followed Module 7 (Version Control with Git), you already know how to do this.
Quick refresher:
# If you have not initialized git yet
git init
git add .
git commit -m "Initial commit"

# Connect to GitHub and push
git remote add origin https://github.com/yourusername/your-repo.git
git push -u origin main
Or use GitHub Desktop:
- Open GitHub Desktop
- File -> Add Local Repository (or drag your folder in)
- Commit your changes
- Push to GitHub
Step 2: Connect Netlify to Your Repository
- Go to app.netlify.com and sign up (or log in)
- Click "Add new site"
- Choose "Import an existing project"
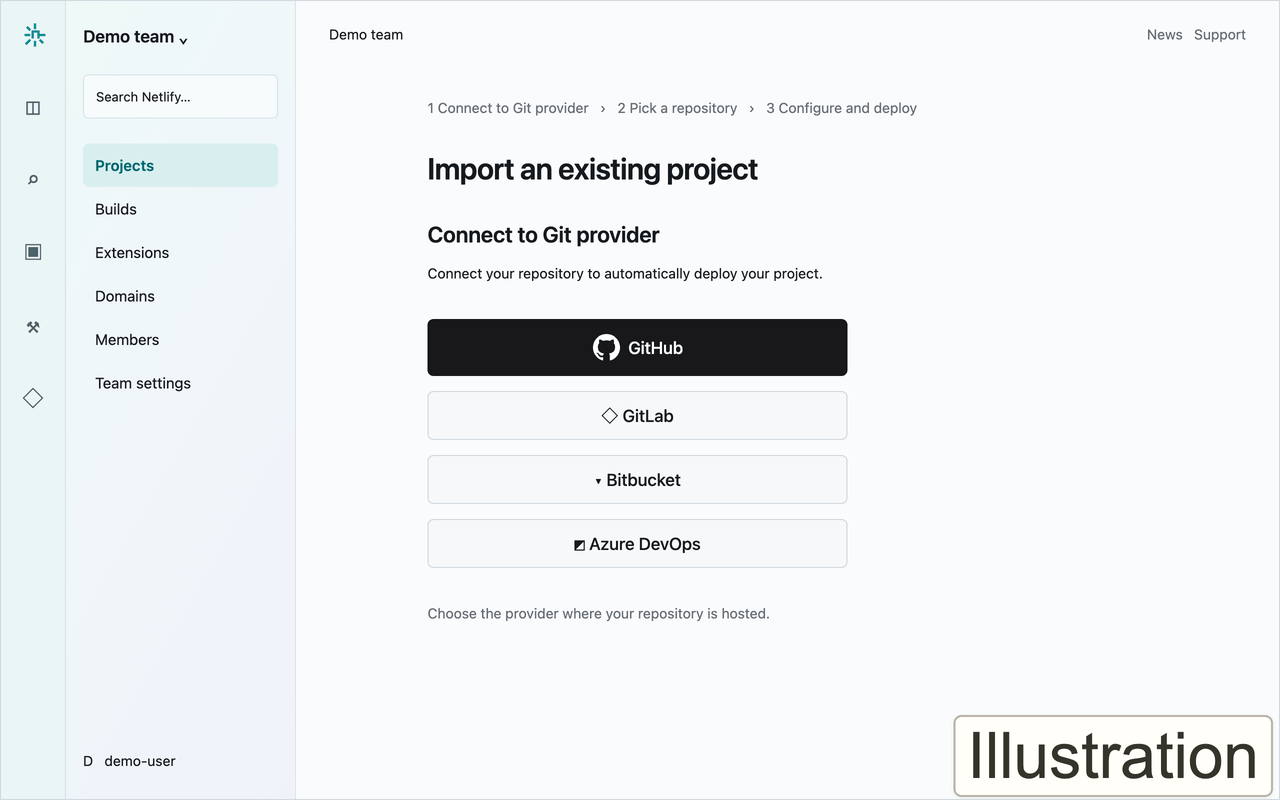
Illustration of Netlify's Git-provider selection.
- Click "Deploy with GitHub"
- Authorize Netlify to access your GitHub account
- Select the repository you want to deploy
Step 3: Configure Build Settings
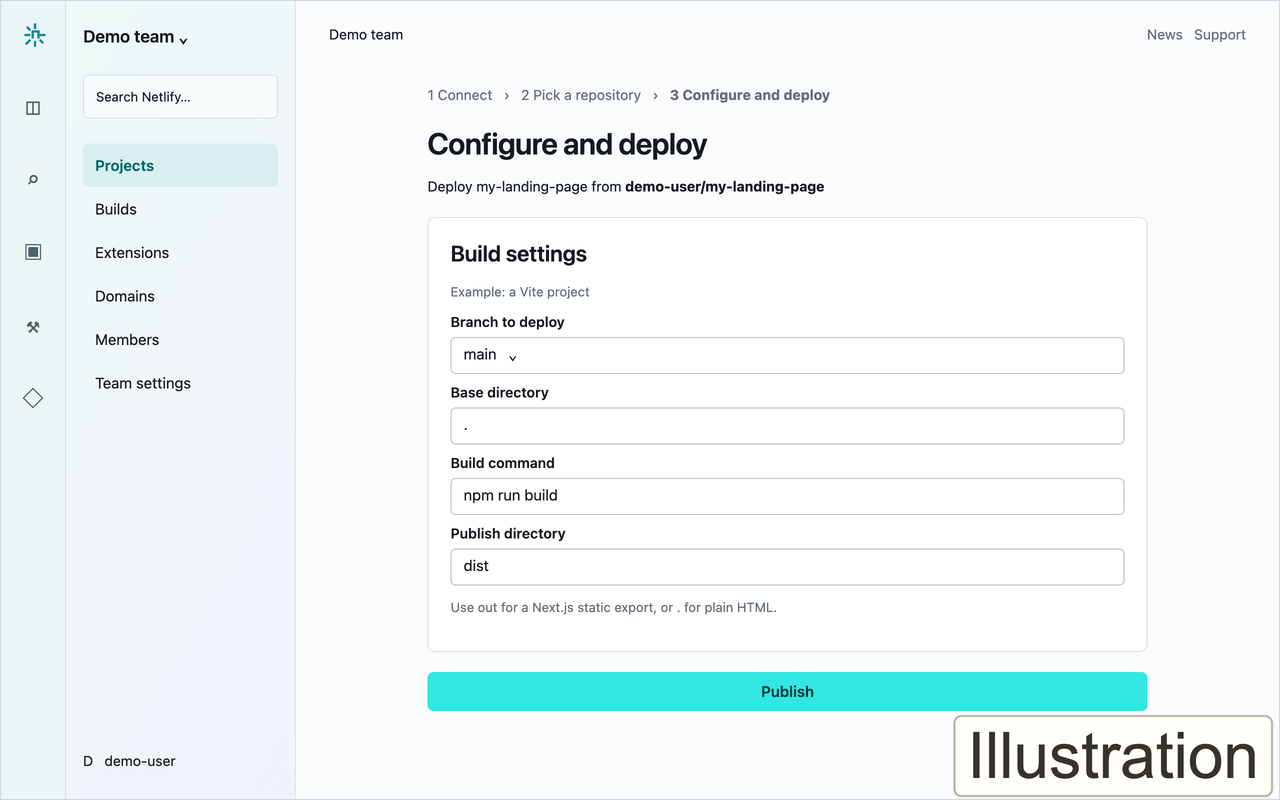
Illustration of Netlify's build settings.
Example settings for Vite. The current import flow ends with Publish; the output directory depends on your project.
Netlify will ask you for build settings. These tell Netlify how to build your project.
Common settings for different frameworks:
| Framework | Build Command | Publish Directory |
|---|---|---|
| Next.js (static export) | npm run build |
out |
| Create React App | npm run build |
build |
| Vite | npm run build |
dist |
| Plain HTML/CSS/JS | (leave blank) | . or folder name |
How to know what to use:
- Check your
package.jsonfor the build script (remember from Module 2 — this file lists your project's dependencies and scripts) - Look for where your built files go (usually
out,build, ordist) - If you are unsure, ask AI: "What are the Netlify build settings for [your framework]?"
Step 4: Deploy!
Click "Deploy site" and watch the magic happen.
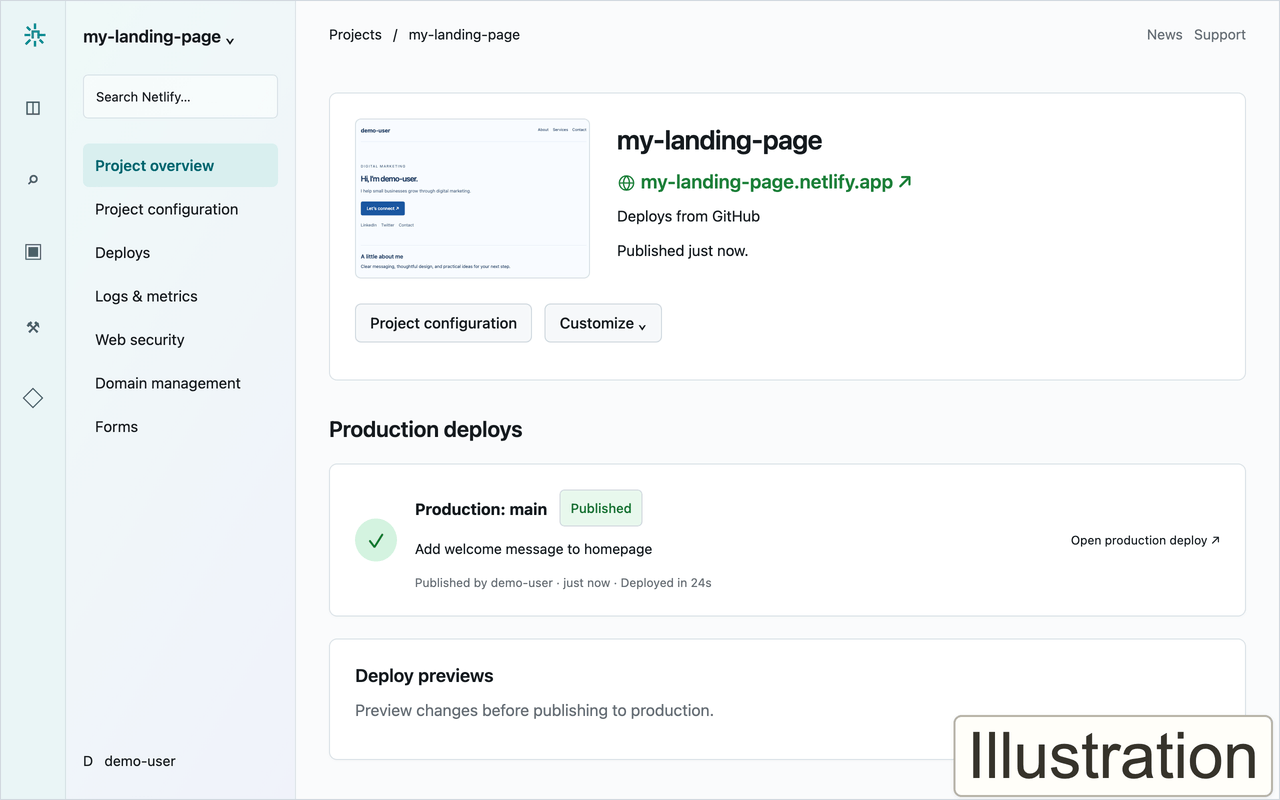
Illustration of Netlify's published-deploy overview.
Netlify will:
- Clone your repository
- Install dependencies (
npm install) - Run your build command
- Upload the output to their servers
- Give you a live URL
Your first URL will look something like random-name-12345.netlify.app. You can change this later, or add a custom domain.
That is it. Your site is now live on the internet!
What If Something Goes Wrong?
If the deploy fails, Netlify shows you the build logs. Look for the error message — it is usually something like:
- "Build command failed" — Your build script has an error. Try running
npm run buildlocally to see the same error. - "Directory not found" — Your publish directory setting is wrong. Check where your build output actually goes.
- "Module not found" — A dependency is missing. Make sure your
package.jsonlists all required packages.
When you are stuck, copy the error message and ask AI for help. Include "Netlify deployment" in your question for more targeted answers. Remember the debugging skills from Module 8 — read the full error message, check the stack trace, and share complete context when asking for help.
Custom Domains and DNS
Your site is live, but random-name-12345.netlify.app is not very professional. Let us set up a custom domain like yourbusiness.com.
Buying a Domain
First, you need to purchase a domain name from a domain registrar. Here are some good options:
Namecheap (namecheap.com)
- Good prices, usually $10-15/year for common extensions
- Straightforward interface
- Free privacy protection
Cloudflare (cloudflare.com/products/registrar)
- Sells domains at cost (no markup)
- Often the cheapest option
- Good if you plan to use other Cloudflare services
Squarespace Domains (formerly Google Domains)
- Simple interface
- Clean management dashboard
- Reasonable prices (~$12-20/year for .com)
Tips for choosing a domain:
.comis still the most recognized extension- Keep it short and memorable
- Avoid hyphens and numbers if possible
- Check that it is not trademarked
DNS Configuration
Once you own a domain, you need to tell it where to find your website. This is done through DNS records (Domain Name System).
Think of DNS like the internet's address book. When someone types yoursite.com, DNS looks up the address and directs them to the right server.
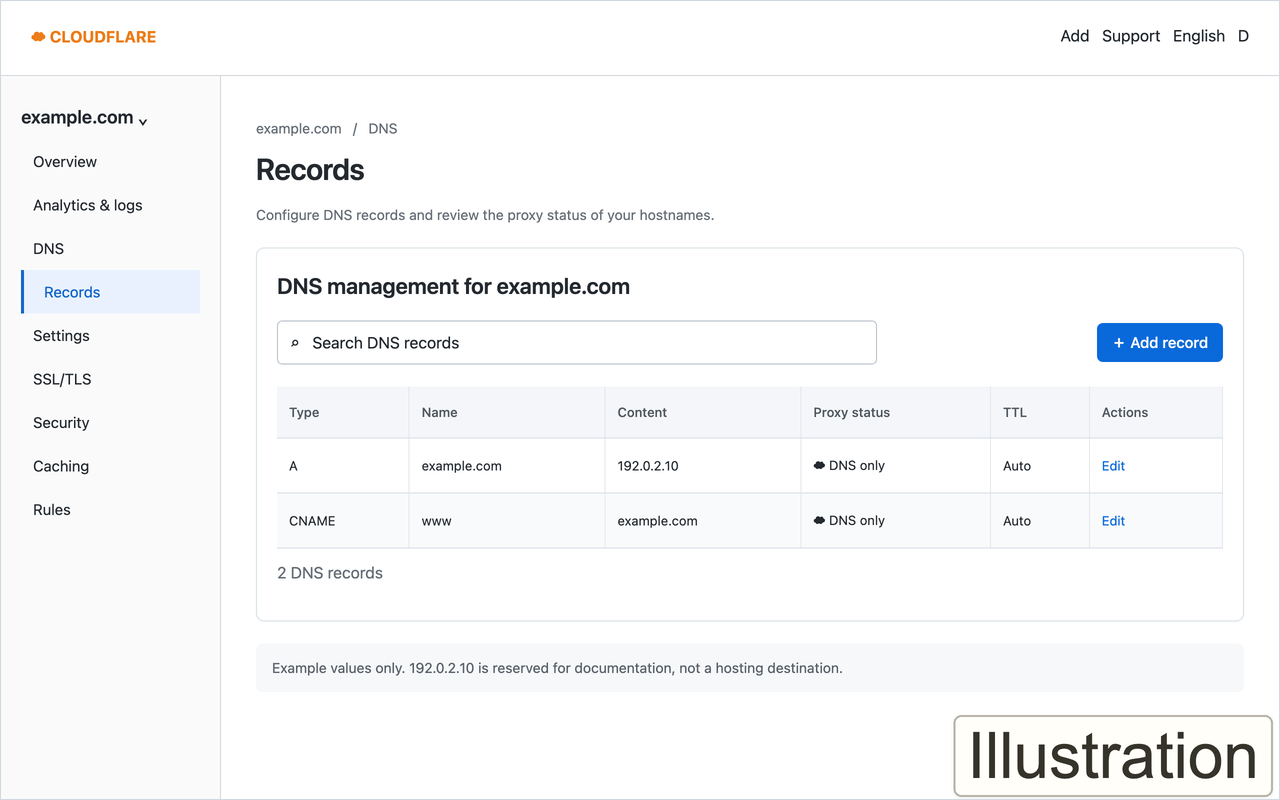
Illustration of a Cloudflare-style DNS record table.
Generic Cloudflare-style layout based on the DNS documentation. The reserved example address is not a Netlify setup instruction; use the values your hosting provider gives you.
The two DNS records you need to know:
A Record (Address Record)
- Points your domain directly to an IP address
- Example:
yourdomain.com->104.198.14.52 - Used for the root domain (no "www")
CNAME Record (Canonical Name)
- Points your domain to another domain name
- Example:
www.yourdomain.com->yourdomain.netlify.app - Used for subdomains like "www"
Adding a Custom Domain in Netlify
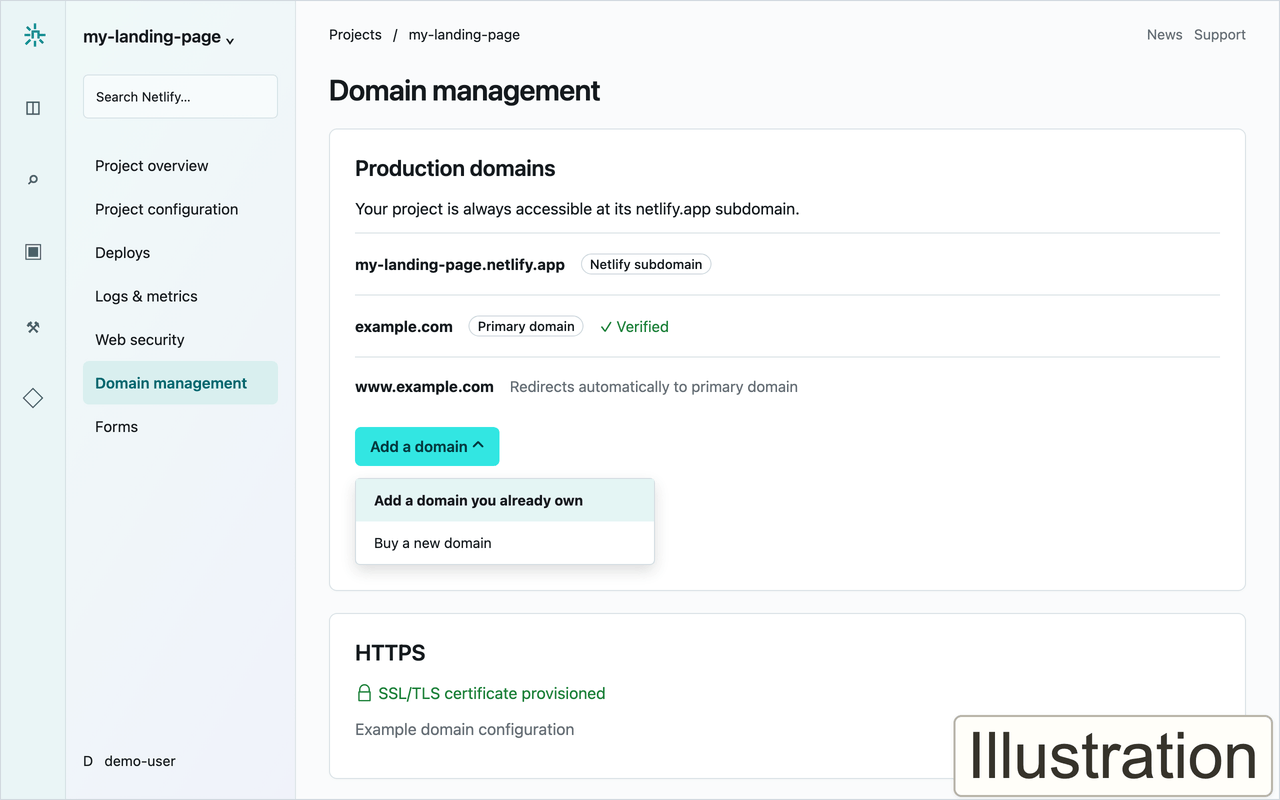
Illustration of Netlify's Domain management screen.
The current interface uses Production domains and Add a domain. Choose Add a domain you already own for an existing custom domain.
- In Netlify, go to Site settings -> Domain management
- Click "Add custom domain"
- Enter your domain name (like
yoursite.com) - Netlify will tell you what DNS records to add
Netlify typically gives you two options:
Option A: Use Netlify DNS (Easier)
- Change your domain's nameservers to Netlify's
- Netlify handles everything automatically
- You manage DNS through Netlify instead of your registrar
Option B: Add DNS records manually (More control)
- Keep your current DNS provider
- Add the A record and CNAME record Netlify specifies
- You stay in control of all DNS settings
Check your registrar before choosing. Domains registered with Cloudflare Registrar must keep Cloudflare's nameservers. For those domains, use Option B and add Netlify's required records in Cloudflare DNS instead of switching to Netlify nameservers.
Propagation Time
After changing DNS records, the changes need to spread across the internet. This is called propagation.
How long it takes: Usually 15 minutes to a few hours. In rare cases, up to 48 hours.
What to expect: Your site might work for some people before others, depending on their location and internet provider.
Checking progress: Tools like whatsmydns.net show whether DNS changes have propagated to different locations around the world.
SSL Certificates (HTTPS)
You have probably noticed that some websites start with http:// and others with https://. The "s" stands for "secure."
What HTTPS does:
- Encrypts data between the user and your server
- Prevents others from seeing or modifying the data
- Lets you check an encrypted connection in the browser's connection information; Chrome uses a site-controls icon rather than a permanent padlock
- Required for many modern features
HTTPS protects data in transit between the browser and the site. It does not certify that the app is trustworthy or free of security flaws.
The good news: Netlify (and Vercel, and most modern hosts) automatically provides free SSL certificates. Once you add your custom domain, HTTPS just works.
Netlify uses Let's Encrypt to generate certificates automatically. You do not need to do anything — it is set up within minutes of adding your domain.
SEO Fundamentals
SEO (Search Engine Optimization) helps search engines understand and rank your site. A few basics go a long way.
Meta Tags
Meta tags live in the <head> section of your HTML and tell search engines about your page.
Title tag: The most important meta tag. It appears in search results and browser tabs.
<title>Alex Johnson - Digital Marketing Consultant | Portland, OR</title>
Keep titles under 60 characters. Include your main keyword and make it compelling to click.
Meta description: The snippet shown below your title in search results.
<meta name="description" content="I help small businesses grow through digital marketing strategy, SEO, and social media management. Based in Portland, serving clients worldwide.">
Keep descriptions under 160 characters. Summarize what visitors will find and include a call to action.
Open Graph for Social Sharing
When someone shares your link on social media (LinkedIn, Twitter, Facebook), these tags control what appears:
<meta property="og:title" content="Alex Johnson - Digital Marketing">
<meta property="og:description" content="Helping small businesses grow through digital marketing.">
<meta property="og:image" content="https://yoursite.com/social-preview.png">
<meta property="og:url" content="https://yoursite.com">
The image matters most. Create a 1200x630 pixel preview image for your site. Without one, shares look bland and get fewer clicks.
Semantic HTML for Search Engines
Search engines read your HTML to understand content structure. Using semantic elements (covered in Module 1) helps:
- Use
<h1>for your main page title (only one per page) - Use
<h2>through<h6>for subheadings in logical order - Use
<main>to indicate primary content - Use
<article>for self-contained content pieces - Use
<nav>for navigation menus
This structure helps search engines identify what your page is about and which parts are most important.
Google Search Console
Google Search Console is a free tool that shows how your site appears in Google search. After deployment, you can:
- Submit your sitemap (helps Google find all your pages)
- See what search queries bring visitors to your site
- Identify any crawling or indexing issues
- Get alerts about security issues
Setting it up requires verifying you own the domain, which you can do through DNS or by adding a meta tag to your site. It is optional for small projects but valuable as your site grows.
Sitemaps
A sitemap is an XML file that lists all the pages on your site. It helps search engines discover and index your content.
Do you need one? For small sites (under 10 pages), search engines usually find everything on their own. For larger sites or those with many pages added over time, a sitemap helps.
Generating a sitemap:
- Next.js: Use the
next-sitemappackage - Other static sites: Online tools like XML-Sitemaps.com can crawl your site and generate one
- Lovable projects: Often handled automatically by the build process
Once generated, upload sitemap.xml to your site's root folder and submit it through Google Search Console.
Robots.txt
The robots.txt file tells search engines what they can and cannot crawl on your site. It lives at yoursite.com/robots.txt.
Basic robots.txt:
User-agent: *
Allow: /
Sitemap: https://yoursite.com/sitemap.xml
This says "all search engines can crawl everything, and here's where my sitemap is."
Crawling is not access control: A Disallow rule asks cooperating crawlers not to fetch a URL. It does not stop people opening it, and a blocked URL can still appear in search results if another site links to it.
Protect admin pages, private previews and sensitive API routes with authentication and server-side authorisation. For a public page you do not want indexed, use noindex and allow crawling so the search engine can read that instruction. See Google's robots.txt guidance.
For most simple sites, the basic version above is all you need.
Core Web Vitals
Core Web Vitals are Google's metrics for measuring user experience. They affect search rankings.
The three metrics:
- LCP (Largest Contentful Paint): How fast the main content loads
- INP (Interaction to Next Paint): How responsive the page is to clicks
- CLS (Cumulative Layout Shift): How much the page jumps around while loading
Checking your vitals:
- Run a Lighthouse audit in Chrome DevTools (F12 → Lighthouse tab)
- Use PageSpeed Insights
- Check Google Search Console's Core Web Vitals report
Quick wins for better scores:
- Optimize images (covered later in this module)
- Avoid large JavaScript bundles
- Set dimensions on images to prevent layout shift
For beginners, focus on the basics first. Core Web Vitals optimization becomes important once you are competing for search rankings.
For now: Focus on getting your title, description, and Open Graph tags right. That covers 80% of SEO for simple sites. The other 20% matters more as your site grows and you start caring about specific keywords and rankings.
Analytics & Measurement
After deploying, the first question is usually "Is anyone actually visiting this?" Analytics tools answer that question.
Why Track Visitors?
Analytics help you understand:
- Whether people are finding your site
- Which pages they visit most
- Where they come from (search, social, direct)
- What devices they use
For personal projects, this is optional. For anything business-related, it is essential.
Privacy-Respecting Options
Google Analytics (most common)
- Free, very powerful
- Owned by Google, which raises privacy concerns
- Can be complex for simple needs
- Requires cookie consent banners in the EU
Plausible (plausible.io)
- Privacy-focused, no cookies needed
- Simple dashboard, easy to understand
- Paid ($9/month) but worth it for businesses
- No cookie banners required
Fathom (usefathom.com)
- Similar to Plausible, privacy-focused
- Slightly higher price, excellent support
- No cookies, GDPR-friendly
Cloudflare Analytics (free)
- Basic traffic stats
- Already available if you use Cloudflare
- Less detailed than others
My recommendation: If you care about privacy (yours and your visitors'), use Plausible or Fathom. If you need free and do not mind complexity, Google Analytics works. For simple projects, Cloudflare Analytics is enough.
What to Track
Visitors vs Page Views:
- A "visitor" is a unique person
- A "page view" is each page they load
- 100 visitors with 3 page views each = 300 page views
Bounce rate: The percentage of visitors who leave after viewing only one page. High bounce rate is not always bad — if someone finds exactly what they need on the first page, that is a success.
Referrers: Where visitors come from. This tells you if your marketing is working.
Do not over-obsess early. When you have 10 visitors a day, statistics do not mean much. Focus on building something useful, then optimize based on data once you have meaningful traffic.
Setting Up Plausible
If you want analytics without privacy concerns, here is how to add Plausible:
Step 1: Create an account at plausible.io (30-day free trial)
Step 2: Add your domain when prompted
Step 3: Add the tracking script to your site's <head>:
<script defer data-domain="yoursite.com" src="https://plausible.io/js/script.js"></script>
For Next.js projects, add it to your _document.js or layout file.
For Lovable projects, you may be able to add it through the settings or by editing the HTML directly.
Step 4: Visit your site and check the Plausible dashboard. Your visit should appear within minutes.
That is it. Plausible shows you visitors, page views, and referrers in a clean dashboard. No cookie banners needed.
Forms Without a Backend
Static sites cannot process form submissions on their own. When someone fills out a contact form, the data needs somewhere to go.
The Problem
A traditional website has a server that receives form data, saves it to a database, and maybe sends an email. Static sites have no server — they are just files.
You need a form service to bridge the gap.
No-Code Solutions
Netlify Forms (easiest if you are already on Netlify)
- Free tier: 100 submissions per month
- Just add
netlifyattribute to your form - View submissions in your Netlify dashboard
- Set up email notifications
Formspree (formspree.io)
- Free tier: 50 submissions per month
- Works with any hosting platform
- Simple setup — just point your form to their endpoint
- Email notifications and integrations
Google Forms (free, but uglier)
- Embed a Google Form on your page
- Free and unlimited
- Less customizable, does not match your site's design
- Data goes to Google Sheets
Setting Up Netlify Forms
If your site is on Netlify, this is the simplest option:
Step 1: Add the netlify attribute to your form:
<form name="contact" method="POST" data-netlify="true">
  <input type="text" name="name" placeholder="Your name" required>
  <input type="email" name="email" placeholder="Your email" required>
  <textarea name="message" placeholder="Your message" required></textarea>
  <button type="submit">Send</button>
</form>
Step 2: Deploy your site. Netlify automatically detects forms with data-netlify="true".
Step 3: In Netlify dashboard, go to Site settings > Forms to see submissions.
Step 4: Set up email notifications under Site settings > Forms > Form notifications.
Setting Up Formspree
If you are not on Netlify, or want more features:
Step 1: Sign up at formspree.io
Step 2: Create a new form and copy your endpoint URL
Step 3: Point your form's action to the endpoint:
<form action="https://formspree.io/f/your-form-id" method="POST">
  <input type="text" name="name" placeholder="Your name" required>
  <input type="email" name="email" placeholder="Your email" required>
  <textarea name="message" placeholder="Your message" required></textarea>
  <button type="submit">Send</button>
</form>
Step 4: Formspree handles the rest — submissions appear in your dashboard, and you get email notifications.
When to Graduate
Signs you have outgrown simple form services:
- You need complex workflows (conditional logic, multi-step forms)
- You want to store data in your own database
- You need real-time validation
- You are hitting free tier limits regularly
At that point, consider:
- Email list services (Buttondown, ConvertKit) for newsletter signups
- CRM integrations through Zapier or Make
- A real backend if your needs are complex
For most static sites, Netlify Forms or Formspree cover everything you need.
CI/CD Basics
You might hear the term "CI/CD" in developer conversations. It sounds complicated, but the concept is simple.
What CI/CD Means
CI = Continuous Integration Every time you push code to GitHub, automated processes run to check if everything works. This might include running tests, checking for errors, and building your project.
CD = Continuous Deployment When those checks pass, your code is automatically deployed to production. No manual steps required.
In plain English: Push your code, and it automatically goes live.
How It Works with Netlify
When you connected Netlify to your GitHub repository, you set up CI/CD without even knowing it.
Here is what happens when you push code:
- GitHub receives your push
- GitHub notifies Netlify "Hey, there's new code"
- Netlify pulls the code from your repository
- Netlify runs your build command (
npm run build) - If the build succeeds, Netlify deploys to production
- If the build fails, Netlify keeps the old version live and notifies you
This means you never have to manually deploy again. Just push to GitHub, and Netlify handles the rest.
Preview Deployments
One of the best features of modern hosting platforms: preview deployments.
Netlify's Deploy Previews are built for eligible pull requests when enabled, with URLs such as deploy-preview-PR_NUMBER--yoursite.netlify.app. Branch deploys are separate: if enabled for a branch such as new-feature, its URL can be new-feature--yoursite.netlify.app. Pushing a branch alone does not mean branch deploys are enabled.
Why this is useful:
- Test changes before they go live
- Share previews with teammates or clients for feedback
- Each eligible pull request gets its own preview URL when Deploy Previews are enabled
- Access depends on the project's visibility and deploy protection settings, not on whether someone knows the link. Check those settings and test as a signed-out visitor before sharing sensitive content. A private Git repository does not by itself protect the deployed site.
Use Netlify's Deploy Preview, branch deploy and project visibility guides to confirm your project's setup. Where available, configure password or team-login protection for previews that must not be public.
When you merge the branch into main, the changes automatically deploy to your production site.
Cloudflare
You might hear about Cloudflare in developer conversations. Let us cover what it does and when you might need it.
What Cloudflare Does
Cloudflare can manage DNS alone or proxy web traffic between your users and your hosting provider. The CDN and traffic-protection features below apply to proxied web records, not DNS-only records.
CDN (Content Delivery Network) Cloudflare has servers around the world. When someone visits your site, they get content from the server closest to them. A user in Tokyo loads your site faster because they are getting it from an Asian server, not your US server.
DDoS Protection DDoS attacks flood your site with fake traffic to take it down. Cloudflare filters out malicious traffic before it reaches your server.
DNS Management Cloudflare can manage your domain's DNS records. Their DNS is fast and has a user-friendly interface.
SSL Certificates Like Netlify, Cloudflare provides free HTTPS for your domains.
When You Need It
You probably do not need Cloudflare if:
- You are just starting out with small projects
- Your hosting provider (Netlify, Vercel) already provides CDN and SSL
- You do not have traffic concerns
Consider Cloudflare if:
- You want faster DNS propagation
- You need additional security features
- You are using a host that does not provide CDN
- You want more control over caching and performance
For most beginners, Netlify or Vercel's built-in features are enough. Cloudflare becomes useful as your projects grow and you need more control.
Basic Setup
If you do decide to use Cloudflare:
- Create a free account at cloudflare.com
- Add your domain
- Cloudflare scans your existing DNS records
- Update your domain's nameservers to Cloudflare's (your registrar's dashboard)
- Wait for propagation (usually under an hour)
Once set up, you manage DNS through Cloudflare's dashboard. For a Proxied web record (orange cloud), HTTP/HTTPS traffic goes through Cloudflare. For a DNS-only record (grey cloud), Cloudflare answers DNS queries but web traffic goes directly to the host, without Cloudflare's proxy protection or caching. Check the proxy status of each relevant record rather than assuming DNS management proxies all traffic.
Maintenance Reality
Your site is deployed. Congratulations! But shipping is not the end — it is the beginning of a new phase.
What Happens After Shipping
A common misconception: once a project is live, it is "done." In reality, shipped projects need ongoing attention.
Things that require maintenance:
- Security updates for dependencies
- Bug fixes as users find issues
- Content updates
- Hosting account management
- Domain renewals
The good news: for simple static sites, maintenance is minimal. But you cannot completely forget about them.
Dependencies Get Outdated
Remember those packages in your node_modules folder? They get updated over time. Some updates fix security vulnerabilities.
GitHub Dependabot automatically monitors your repository and creates pull requests when it finds outdated dependencies with security issues.
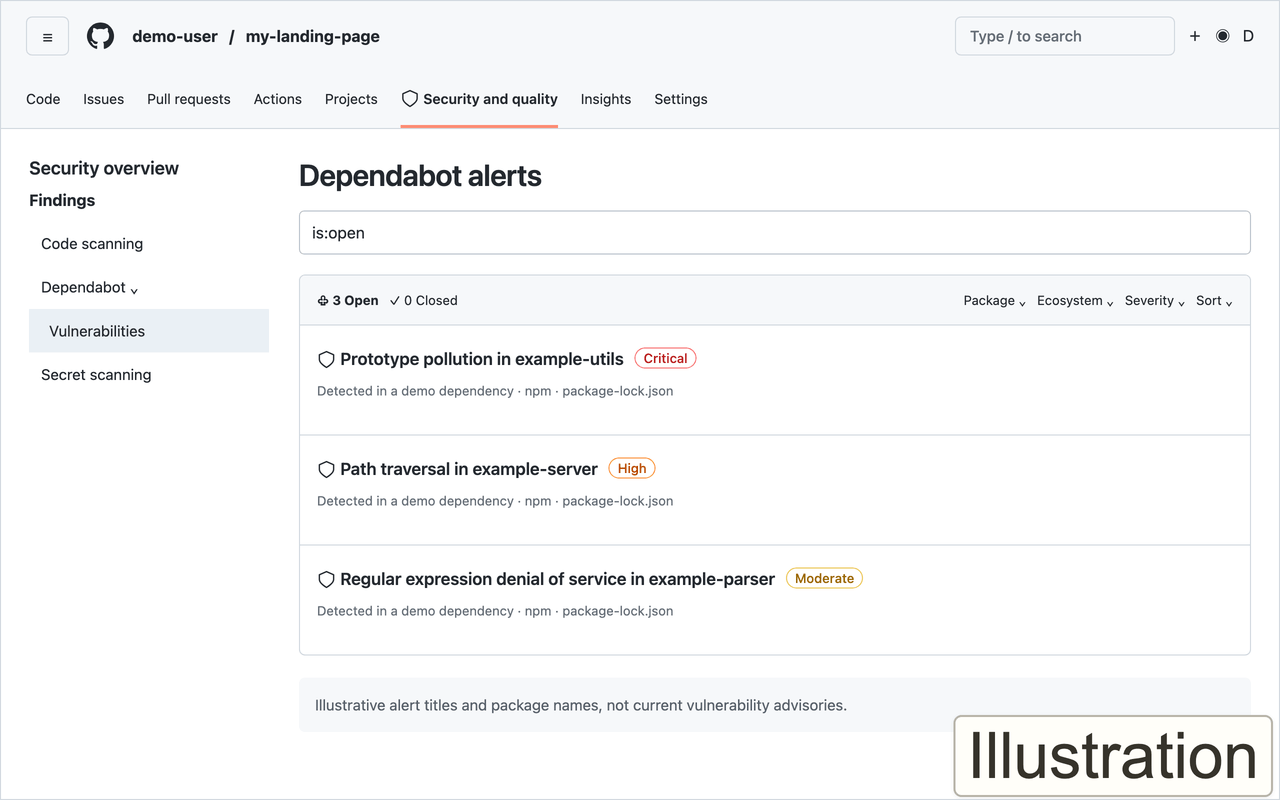
Illustration of GitHub's Dependabot alerts.
The alert titles and package names are examples, not current vulnerability advisories.
When you see these alerts:
- Read what the vulnerability is
- Check if it affects your project
- Review and merge the suggested update
- Let your CI/CD pipeline deploy the fix
How often to check: At minimum, once a month. Set a calendar reminder.
Monthly Check-In Routine
Here is a simple maintenance routine for your deployed projects:
Every month, spend 15 minutes:
-
Check GitHub for security alerts
- Look for Dependabot notifications
- Merge any security updates
-
Verify the site still works
- Visit your production URL
- Test critical features (forms, links, etc.)
- Check for visual issues
-
Review hosting dashboard
- Any unusual traffic?
- Are you approaching any limits?
- Any billing issues?
-
Check domain renewal date
- Domains typically renew yearly
- Set up auto-renewal or calendar reminders
- Losing your domain is painful — do not let it expire!
When Things Break
Even with maintenance, things occasionally break. Here is what to do:
Check if it is actually broken:
- Try a different browser
- Try incognito mode (clears cache)
- Ask someone else to check
Check Netlify deploy status:
- Did a recent deploy fail?
- Can you roll back to a previous deploy?
Check external services:
- If you use APIs, are they working?
- Is there a known outage at your hosting provider?
For serious issues:
- Netlify and Vercel have status pages showing outages
- Most problems resolve themselves within hours
- If it is your code, git revert to a working version
Documentation for Future You
Six months from now, you might need to update this project. Will you remember how it works?
Keep a README file with:
- How to run the project locally
- What environment variables are needed
- How to deploy (even if it is automatic)
- Any quirks or gotchas
Document in your hosting dashboard:
- What build command you used
- What environment variables are set
- Any custom configuration
Future you will thank present you for leaving notes.
Beyond Static Sites: Maintaining Complex Applications
The skills you are learning in this course go far beyond building simple websites. You might build an internal dashboard for your team, a CRM to track client relationships, a marketing tool that pulls data from APIs, or any number of business tools. These more complex applications need more attention than a static landing page.
Here is what to keep in mind as your projects grow in complexity.
Database maintenance
If your project stores data (for example, in Supabase or another database):
- Set up a backup and restore plan matched to your hosting plan. Supabase's Free tier does not include automatic daily backups; arrange regular exports and keep protected off-site copies. Database backups do not include uploaded Storage objects, so back those up separately too. Test restoring both the database and uploaded files in an isolated environment before relying on the plan.
- Monitor storage growth — databases can grow faster than you expect, especially if you log user activity
- Clean stale data periodically — old sessions, expired tokens, or test records pile up over time
- Ask your AI assistant: "Review my database schema and suggest a cleanup strategy for stale data"
API and integration monitoring
If your project connects to third-party services (payment processors, email providers, data APIs):
- External APIs change and break — an API you rely on today might deprecate an endpoint tomorrow
- Monitor uptime — if a critical API goes down, your tool breaks too. Services like UptimeRobot (free tier available) can alert you
- Rotate API keys periodically — treat keys like passwords
- When an API changes, paste the error message into your AI assistant along with the API documentation. It is usually a quick fix
User data and authentication
If your project has user accounts (for example, through Supabase Auth):
- Review access logs periodically — look for unusual login patterns
- Have a plan for password resets and account recovery
- Monitor for suspicious activity — many failed login attempts, accounts from unexpected locations
- Keep authentication libraries up to date — security vulnerabilities here are especially serious
Cost monitoring
Many modern tools charge based on usage rather than a flat fee:
- Track costs for API calls, database storage, serverless functions, and bandwidth
- Set budget alerts — most platforms (Vercel, Supabase, AWS) let you configure spending notifications
- A project that costs nothing during development can surprise you once real users start using it
- Review your billing dashboards as part of your monthly check-in
Error tracking
Your users will encounter errors they never tell you about:
- Check your browser console when testing — errors show up there first
- Review your hosting platform's logs (Netlify, Vercel, and others all provide function logs)
- For more complex applications, consider simple error reporting — even a basic approach like logging errors to a spreadsheet via a webhook can be valuable
- Periodically test your own application end-to-end, the way a real user would
Performance monitoring
As your application grows and accumulates data, it can slow down:
- Check loading times periodically, especially for data-heavy pages
- Use your browser's DevTools Network tab to see what is slow
- If pages that used to be fast become sluggish, the culprit is usually growing data or unoptimized queries
- Ask your AI assistant: "My dashboard page loads slowly when there are more than 500 records. Here is my code — how can I optimize it?"
Scaling: start simple, add complexity only when needed
A practical rule of thumb for internal business tools:
- Start with non-sensitive prototypes: LocalStorage or IndexedDB can be useful for practice data, not secrets or sensitive business records. XSS can read or change stored data, and someone with access to the device or browser profile may be able to read it. Persistent data can remain after a session, while browser cleanup can also erase it. Decide what to retain, how to clear it and how to recover anything worth keeping. See the OWASP HTML5 Security Cheat Sheet.
- Add a backend when you need sharing — when multiple people need access to the same data, platforms like Supabase handle authentication, databases, and real-time sync. But this adds maintenance responsibility: user management, data backups, access control
- Do not over-engineer early — a tool that works for you locally is infinitely more valuable than a complex multi-user system that never gets finished
Security audits
Periodically ask AI to review your codebase for security issues:
- Paste your code into your AI assistant and ask: "Review this code for security vulnerabilities, especially around user input handling and data storage"
- Use different AI models for this — as covered in the Tips & Tricks module, a second opinion from a different LLM can catch things the first one missed
- Pay special attention to any code that handles user input, authentication, or financial data
- Even simple projects can have vulnerabilities — it only takes a few minutes to check
The key takeaway: The more your application does, the more it needs your attention. But do not let this intimidate you — most maintenance is routine, and your AI assistant can help you with every step. The important thing is to be aware of what needs monitoring, and to check in regularly.
Image Optimization
Images are often the largest files on a webpage. Optimizing them makes your site load faster and improves user experience.
Why Image Size Matters
A single unoptimized photo from your phone can be 3-5 MB. If your landing page has three such images, visitors are downloading 15 MB before they see anything. On mobile connections, that could mean waiting 10+ seconds.
Optimized images can be 50-200 KB each — 90% smaller — while looking nearly identical.
Free Optimization Tools
Squoosh (squoosh.app)
- Drag and drop an image, see before/after comparison
- Adjust quality until file size is acceptable
- Works in your browser, nothing to install
TinyPNG (tinypng.com)
- Upload images, download optimized versions
- Great for PNG and JPEG files
- Free for most use cases
Quick Optimization Workflow
- Before adding an image to your project, open it in Squoosh
- Resize if needed — a 4000px wide image for a 400px space wastes bandwidth
- Compress — aim for 100-300 KB for large images, under 50 KB for small ones
- Choose the right format — JPEG for photos, PNG for graphics with transparency
WebP Format
WebP is a modern image format that is typically 25-35% smaller than JPEG at the same quality. Most browsers support it now.
When to use WebP:
- Your hosting platform supports it
- You do not need to support very old browsers
- File size matters (large images, mobile users)
Squoosh can convert images to WebP. For simple projects, JPEG/PNG are fine — WebP is a nice optimization but not essential.
When to Optimize
Always optimize before deployment. It is much easier to resize and compress images on your computer than to fix slow loading times later.
Images to watch:
- Photos from phones or cameras (always huge)
- Screenshots (often larger than needed)
- Background images (can be compressed heavily)
For AI-generated sites like Lovable projects, the tool often handles optimization. But if you are adding your own images, run them through Squoosh first.
Key Takeaways
- Development (localhost) differs from production (live site)
- Netlify, Vercel, and GitHub Pages make static site hosting easy
- Custom domains require DNS configuration — A records and CNAMEs
- CI/CD automates building and deploying on every code change
- Shipped projects require ongoing maintenance: security updates, domain renewals, and monthly check-ins
- Document everything for future you
What's Next?
You now know how to deploy and maintain your projects. But there is one more important skill: knowing when NOT to build something yourself.
Want to discuss a project like this?
SFLOW helps companies implement practical AI solutions — from custom platforms to industrial integrations with your existing systems.